Wednesday, September 19, 2012

The Death of a Dream


One of the things you should do if  you put a glaze on your cabinets (or as we did with the decorative pinstripe) and (as we also did), sand down to bare wood to show age, is to put a polyurethane clear coat (yeah, CLEAR coat, right) on it to seal the glaze and protect the wood.   Unfortunately, an oil based polyurethane has a yellow tint to it.  How yellow - I didn't realize even though Paul had done a test door for me (it didn't look that yellow to be honest).

Now to be fair, Paul and the guy at the paint store told me this up front.  And, we talked about a water based polyurethane, which doesn't have a yellow tint, but it does not hold up as well and we would have had to wait longer for the glaze to dry.  And to be truthful, that pinstripe glaze adds an elegance and an old look to the cabinets.  If we had just painted them white, it would not have shown as much detail and these doors have a lot of detail and character.  So we had to poly them (that is what Paul calls it).

So, I kept my fingers crossed.  And, hoped, and hoped, and hoped.

Well, my hopes were dashed.  Paul sprayed the polyurethane on the hood one Sunday and showed it to me.  I cried, I really, really cried.  And I was in a bad mood for the rest of the day. For the rest of the week (Paul says, although I tried to hide it).  Here's the hood in question without the glaze and with the glaze and polyurethane. The pictures don't really show it, but trust me, it is there.


Without Glaze
With Glaze

Without Glaze
With Glaze


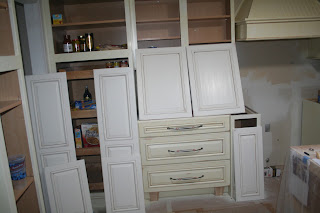
Here's the kitchen showing the doors before the polyurethane was applied and the difference in color. 


To Paul's credit and because he has to live with me, he tried to make it right.  Our next door neighbor, as I have mentioned before, paints motorcycles. So Paul brought him over for a consultation.   His suggestion was to wet sand it with 600 grit wet/dry sandpaper. So Paul gave it a shot.  And it even added to the aged look.

Now, does it work in the whole scheme of things, making the cabinets look like they have been there a hundred years?  Yes.  And does it work in this kitchen?  Yes.  But, I feel compromised.  Cheated.  Almost violated.  OK, maybe violated is a little strong.  But I did feel cheated.

To top it off, when Paul sprayed the poly on the doors, he had to do it twice, TWICE, because it didn't match the cabinets and drawers that had been previously sprayed with the poly.

And you know what really ticks me off?  That I spent all that time looking for the "perfect white" when I could have just used the paint color that we paint the woodwork with.


Monday, September 17, 2012

Painting 101

The cabinets are up and now it is time to paint.  You'd think all you needed to do was just slap a coat of paint up there right? 

Oh contrare, mon frere.  It takes a lot of preparation to make this puppy work.

First clean and sand (rough up) your cabinets if you are refinishing exiting cabinets.  If you are painting brand new cabinets as we did, I am not sure that the cleaning part is necessary, and since these came from the factory ready to stain, they didn't need much sanding either.  Paul still ran over them with a clean rag and paint thinner just in case.   If you are painting existing cabinets, then invest in a good degreaser/cleaner. 


Second, prep your work area.   If you are spraying cabinets, you don't want to have to clean paint up from all over the place now do you?  We briefly talked about spraying the inside of the cabinets white also, but decided it would look odd.  (Plus the cabinets that come from Kraft Maid painted are not painted on the inside).  See example below.


Of course that is Paul's prep work.  The average DIYer might not go to that extreme. 

Then you spray your primer, and remember, cheap paint makes a cheap finished project.  Kitchen after primer has been sprayed.  We used  Zinsser oil base primer.  Paul has also used Kilz Premium oil based primer.  Why he used Zinnser I am not sure, but he was very happy with the results.


Then you wait, and wait and wait for the primer to dry (the can says it is ready to top coat in one hour, so I think Paul was sandbagging) . Then you sand again for a smooth finish and add a second coat if necessary.  Then you wait, wait and wait again (sandbagging again I assume).    

Lightly sand, and then take your handy, dandy spray gun or brush and put the actual paint color on.  We used a enamel based paint on ours. If you want durability, oil base is the way to go.  More expensive, but it shows.

Now Paul had purchased this inexpensive HVLP paint gun for $12.95 that a friend who paints motorcycles suggested.  Believe it or not that inexpensive little gun worked extremely well.  Here are photos of Paul in the garage painting the doors. 


Notice the easel that the doors are sitting on. He built that himself in order to hold the doors while painting.   Now the doors have to lie flat until dry.  We couldn't keep them in garage because the bugs and creepy crawlies would land on the doors and then he would have had to start all over again.  So, he worked out  a system, the doors would come in the kitchen and sit on the counters, paint cans, the island, etc.   And how did we know when the doors were ready to come in? Like in the musical Sweeney Todd, he knocked three times and we opened the door and the doors came in.  However, unlike Sweeney Todd, there was no bloodshed, as long as we didn't hit the doors on something.


Here they are resting comfortably to dry. After the doors and cabinets were dry, Paul set the doors and drawers in place and had me go around and mark where I wanted worn places so that they looked older (remember, I wanted them to look like they were in my grandmother's kitchen) so I had to diagram every spot that I wanted sanded.  Now our vacation was coming up so Paul packed them in the car and took them with us on our vacation to Colorado so that he could sand on them, he didn't want to lose a weeks worth of time while gone from home (talking about anal, geez!) and then the doors were "pinstriped" for lack of a better word.   We decided not to glaze over the whole door, but rather used a burnt umber glaze in the nooks and crannies of the doors.  Once that is dry, the a polyurethane finish is sprayed on to protect the cabinets and doors.

The one thing you need to remember in painting cabinets - Patience is a virtue.  

Monday, September 3, 2012

The Great Granite Hunt - Part II

The next weekend, armed with internet knowledge of more granite yards (warehouses), we set off.  Now, the first place we went to, everything I liked on the sample floor was no longer available and the woman kept showing me things I wasn't interested in.  Again, I didn't think I was going to find it.

Next we head to Texas Granite off of I-35.  I learned a lot from them.  I learned I was an exotic type of girl and I liked granite with more movement.  Again, I learned that all stones are not the same, as I saw pieces of one stone that I liked, but didn't like it's companion stone.  However, their warehouse was closed on Saturday and we ventured on.  We then went to Allied Stone.  I saw a piece there that I liked called "Yellow River".  Now it looked like an old creek bed, but with a big old stripe of blue running through the stone. Since blue was not in my color scheme, it wasn't going to work.

Next we headed to Louisiana Stone over on Zodiac Lane.  Once again we find "Yellow River", but it is not as pretty as the Yellow River that we found at Allied.   We keep looking and Paul finds one he likes called "Golden Rustic."  I liked it but it's still not my A HA moment.   We did talk to the manager and although he still wouldn't tell us a price, he did educate us on granite prices.  Granites are classified into price groups - typically groups 1 through 7 - Group 1 being the least expensive and Group 7 being in the OMG ( what? you think you're f***ing rich) category.  Golden Rustic was in Level 3, so I felt pretty good. 

We go next door to Levantina Stone and there is it  "Yellow River", the slab of my dreams.  It had no blue in it and it looked in the OMG category.  It was a Group 4.

I am hopeful - two stones.  Now, I just need to find a fabricator and get some prices.  I emailed V, our KD who gave me two bids from two different folks.  I wasn't crazy about them, simply because I didn't understand them.  One figure was a bid for the slab and the other was a bid for the fabrication.  You see all these ads that say $55.00 per square foot, etc.  That's what I wanted.  So I asked her for one more place and she directed me to Heritage Stonecraft.  What I liked about this place was it was family owned and they were quick to respond to my email.  I have to say I was happier with their bid than the other two and I took a deep breath, went in and talked to their salesperson and set up an appointment to have the template done.  I also picked my edge which was an ogee. They also gave me another place to go look at slabs.

Now, I had to figure out which stone. I went back again with the piece of the hood, a sample of my flooring, and the handle of  the cabinet hardware.  I put them down by each slab.  I went and looked at Yellow River first and then I went back and looked at Golden Rustic.  To be honest, I couldn't decide.  Golden Rustic was a quieter stone, Yellow River was in your face, let's have a party.  I then went over to Dal-Tile (which was a stupid move) and saw a third one.

So, Heritage comes out and measures, they do it by computer which is really cool.  The person who came out also told me that when I picked my slab, to run my hands over the surface (to feel for cracks that will compromise the stone during cutting).  They also offer a service where once your slab comes in, you can schedule a template appointment, where you can help decide how the granite will be cut. Now there are certain things that you can't do when you cut a piece of granite, like take a big old hunk out of the middle.  That's why you make the template appointment.

As Paul said this was my stone, and he wasn't going to make the decision for me, unless I would do things that I am unable to talk about here.  So, I took my 17 year old daughter with me.  She has the eye, like her father. And she was nice enough to pick me up at work and bring me an iced coffee to go do this.  

We first went back to Dal-Tile.  Nixed that one.  Then we went and looked at Golden Rustic.  Then we looked at Yellow River.   I asked her, so . . . . . ? My very intelligent 17 year old looked at me and said. "Mom, you have been saying you want the kitchen to be calm, comfortable and an oasis, right?" "Yes", I said.  And she said what I had been thinking all along, that the Yellow River (or River of Gold as Paul called it), although gorgeous, was an "in your face" stone, and the Golden Rustic,while being restful, would work better.

So, I made my decision, went back over to Louisiana and picked my two slabs.  The kicker on this was Golden Rustic was less expensive. Thank  you Paul.


The Great Granite Hunt - Part I

I was really excited about looking for granite.  Going through granite yards and becoming one with the granite.  At least, until I started looking for it.

I naively thought I would be trucking through actual yards outside, like we did in Colorado when we bought flagstone.  Yes I bought Colorado flagstone one year while we were on vacation for a pathway and hauled it home to Mansfield.  Hey it was a LOT less expensive than what I could have bought in Texas.    

HA!  Granite yards (or at least in Texas) are granite warehouses.  Big warehouses that are not air conditioned.  Now if you live in Texas, then you know that during the summer it is hotter than Hades here and humid.  That's probably why, most of these places open at 8:00 a.m. and close at noon on Saturday and provide bottled water while you look at stones.

And, since I wanted to look at stones, not samples, I had to go to a yard, rather than just a store.  Because samples although they are nice, don't necessarily reflect the actual stone.  Granite is a fossil, one stone slab can be completely different from another in the same family.

So after locating various granite yards in the Dallas-Fort Worth area, Paul and I set out one Saturday morning on this quest.  I knew what I didn't want, St.Cecelia, Black, Gold, but I really didn't know what I wanted.   I knew I would know when I saw it. I wanted that "A Ha" moment.  If you ever watch "Say Yes to the Dress" or "I Found the Dress", those women have their "A Ha" moment when they find their wedding dress.  That's what I wanted with the granite, since I was probably going to pay as much as some of those women do for a wedding dress.

The first granite place we went to was a small shop in Richardson.  I went in with an open mind.  Although I liked their prices, I didn't see any granite that made my heart sing.  Then we went to IMC Granite over on Zodiac Lane.  You walk in, you have to sign a waiver that if a piece of granite falls on you, you won't sue the company (I am kidding, but you do have to sign a waiver).  Then they unleash you into their warehouse. And although they had many lovely granite selections to chose from, my A HA moment wasn't happening.

I learned another thing that day.  You can't get a price per square foot from the supplier.  You have to have a fabricator in order to get a price.  Now, that created a problem.  I didn't want to fall in love and find out I couldn't afford it - like trying on a wedding dress that is way over your budget. Nothing else would compare after that.

I went home grumpy, hot and discouraged. See Part II.


Sunday, September 2, 2012

Not Bad, He Says, Glad it's Painted, he says

There are two types of DIYer's according to my husband.  The first are those who slap stuff up and just don't care, those who take their time and do it the right way, and then there is Paul. 

Now, don't get me wrong, Paul does wonderful work, even behind the walls.  It's just hard to take the "look at that miniscule crooked line that no one else can see" on occasion.  

Take the case of the range hood.   I personally didn't care what type of range hood we had, I was more concerned about the wooden cover.   I left the actual mechanism to Paul.   And he wanted an American made product (Go USA), so we ended up with a Vent-A-Hood.   So the hood liner is purchased and put in.


Then comes the hard part.  Picking the wooden cover.  Here's a photo I gave Paul of what I liked after scouring the internet.


With the exception of the back wall, since I thought it was tacky.  So Paul starts to build.  The first one, well let's just say it was an experiment, since the angles on each side weren't the same.  So, Paul takes it apart and starts again and there were still some issues with it. And, I think he put more pressure on himself, since V, our KD kept saying, "Since you are so handy Paul, I know you can build this."  Trying to be helpful as I can see he is getting more frustrated, I say, "you know we can buy one for $800.00."  The gauntlet was thrown down, and Paul started again.

Here's the a picture of the finished product that he sent me at work, with the email caption "Not bad, glad it is painted."


And you know what he is most disappointed in?  That the inside is not pristine and lined up.  I said, "Do you really think someone is going to pull it off and look inside?" No.

The other problem was when it was hung, it was about an 1/8th of an inch off center.  I made him rehang it.  Would I have had a carpenter done that?  You bet.

Total cost about $125.00.